Category Archives: How-To

Wooden Board Infilling pt. 2

So, I’ve found some spare wooden boards in the studio that have perfect woodworm holes to practice on.

I’ve also spoken with the Objects Conservator at The Royal Cornwall Institute – Laura Radcliffe about how best to go about the infills, she’s given me some good pointers, and I’ve followed her instructions with some changes or tweaks…

Area #1 to be filled. Before treatment.

Area #1 to be filled. Before treatment.

Area #2 to be filled. Before treatment.

Area #2 to be filled. Before treatment.

First of all, I’ve primed the area to be filled with the 10% Paraloid solution, by flooding the tunnels and holes, making sure all the walls are covered to prevent any of the infills seeping into the surrounding wood. I did this twice, just to make sure.

Area #1 with 1 coat of 10% Paraloid.

Area #1 with 1 coat of 10% Paraloid.

Area #1 with 2 coats of Paraloid.

Area #1 with 2 coats of Paraloid.

Notice that it really discolours any leather that it comes into contact with.

Area #2 with 2 layers of 10% Paraloid.

Area #2 with 2 layers of 10% Paraloid.

I then made up a mixture of the micro balloons, with two drops of burnt umber acrylic ink (Daler Rowney). At this point it’s like flour, and adding the paint doesn’t seem to do anything – you can’t mix it up.

Using small metal pots (or glass or ceramic, but not plastic) pour out a little of the 40% Paraloid, and add the micro balloons and acrylic slowly, stirring all the time. For the first test I made up a thick putty-like mixture:

Putty-like mixture.

Putty-like mixture.

This I scraped onto the boards with a small spatula, pressing it down into the holes – like using Polyfilla. It did not look great, and the solvent evaporated so quickly that it became really stringy and difficult to work – sticking more to the spatula than the wood.

Filling holes with the putty-like mixture.

Filling holes with the putty-like mixture – area #1.

So I thinned it down, by adding a splash at a time of the 10% Paraloid solution, until the filler was the consistency of double cream. This needs constant stirring, as the mix tends to separate into the balloons on top and the solvent underneath – kind of like a horrible scum/foam!

Thinner filler mix

Thinner filler mix

Using the pointy end of the spatula, I was able to dribble this mix into the areas to be filled, agitating slightly to make sure of an even coverage. Leaving the filler raised above the surface of the wood to be sanded/cut down later.

Area #2, filled with the thinner mix.

Area #2, filled with the thinner mix.

When semi-dry, I was able to scrape off the top layer, so the fill was about level with the surface of the board, and then re do the process after it had completely dried, as the fill had shrunk very slightly. The end results of both areas #1 and #2 were sanded down with fine grit sandpaper.

Area #2 after treatment.

Area #2 after treatment.

Area #2 after treatment.

Area #2 after treatment.

Area #1 after treatment.

Area #1 after treatment.

Area #1 needed some further fills after sanding down, as there were still some voids. I did this with the thinner mixture, and sanded again afterwards.

Area #1 after second treatment.

Area #1 after second treatment.

This type of treatment has worked really well for these small holes, I have yet to experiment with the solvents (ethanol/acetone) to remove the filler residue from around the holes. But if that works, then the fills can be tidied up a lot easier, and will cut down on the amount of sanding the fills need.

Wooden Board Infilling pt. 1

I’m currently working on a few large bindings, one of which has wooden boards that have become a feast for woodworm. All along the joint edge where I’ve uncovered the board by removing the previous deteriorated red rotten reback leather, there’s evidence of quite a lot of insect damage. The wood has become crumbly and needs to be strengthened, consolidated and filled before the boards can be reattached to the textblock and it has a new re-back.

Joint Edge of Back Board

Joint Edge of Back Board

After some research and consultation with PZ trainee Gwendoline (who has infilled wood in a previous project) I decided that the wood should be consolidated with Paraliod B72 before being filled. This will prevent seepage from the infill into the wood and reduce any damage from the infill material.

To make up the Paraloid solution you will need:
–  a clean glass jar with a tight fitting lid, large enough to take 100ml solution
– an accurate measuring flask
– an accurate set of scales
– Paraloid B72 ‘beads’ (suppliers below).
– Acetone
– Ethanol
– cheesecloth
– string
– permanent marker
– extra jam jar.

To make up a 10% solution follow these instructions:

– Weigh out 10g of Paraloid and fasten into a bag using the cheesecloth and string.

10g Paraloid

10g Paraloid

Paraloid and cheesecloth

Paraloid and cheesecloth

Paraloid in cheesecloth 'bag'

Paraloid in cheesecloth ‘bag’

– pour 100ml water into your clean glass jar and mark off where the liquid comes to with a  marker. Then pour out the water and dry up the jar.

100ml marked off.

100ml marked off.

-Measure out 85ml of Acetone and pour into a seperate clean jar. The measure out 15ml of Ethanol and pour into the same jar.

– Place the bag of Paraloid into the clean jar and then carefully fill up with the Ethanol/Acetone mix to the marked line and discard the rest.

– Lift up the bag so it’s suspended in the sovent leaving the string dangling outside and then screw up the lid tightly.

Paraloid suspended in solution.

Paraloid suspended in solution.

– Leave to dissolve overnight, then discard the cheesecloth and string, squeezing out whilst wearing gloves.

Pulp Infilling for Boards

As a continuation of the Bible project, I’m going to dedicate a post specifically to preparing and using paper pulp for infilling the loose board, along the joint edge. At the end there’s a list of suppliers.

Board edge before

Board edge before

First, I removed all the cruddy adhesive from along the joint, without the addition of any moisture – this meant that small bits of the board came away too, and also I made sure that I removed any bits that were weakly attached.

Then I split the board, not much – only by about 5-7mm, and inserted pieces of thick Hahnemuhle paper (180gsm). Several pieces were easier to handle than one strip. Theses were adhered into the split with a thick and dry WSP, and pressed lightly between thin sheets of plastazote (as we have no felts in the studio). This will be used to support the pulp.

Split board with Hahnemuhle.

Split board with Hahnemuhle.

Then – to prepare the pulp. We’ve got a few sheets of paper pulp in the studio which Lizzie got when she went on one of Alan Buchanan’s courses, however, I’ve found some that’s supplied to be used for leaf-casting from PEL.

Paper Pulp Sheet

Paper Pulp Sheet

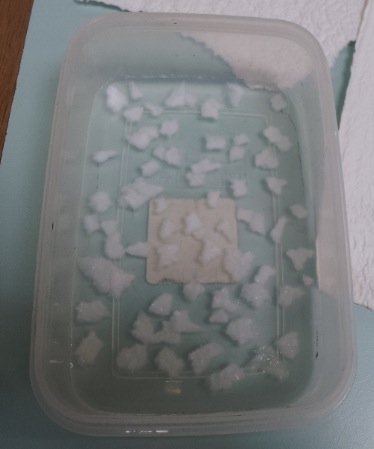
Tear this up into small pieces and soak for about 20mins in water, then drain and replace water with thinned paste, and then leave to soak for another 20mins, the pieces will have swelled, and now be saturated with paste.

Torn pieces in water.

Torn pieces in water.

Torn pieces in thin paste.

Torn pieces in thin paste.

Prime the areas to be filled with a smooth WSP (un-thinned) and then squeeze out the excess moisture from small amount of pulp at a time. I like to take some out and leave in a tea strainer over the main tray – then use this to get rid of any excess water/paste. Then work small amounts along the edge of the board, making sure to press into the contours, and smush it together as much as possible, don’t worry about going outside your guide lines, as it can all be trimmed and sanded later. Smooth down the pulp infill with a finger, squidge down some blotter (over holytex) to remove some excess moisture, and leave to dry, possibly for a day and night (this one is still damp the next morning) . The pulp will shrink, and this process may need to be repeated a few times before there’s enough to work with.

First infill - still very very wet.

First infill – still very very wet.

Once you’re happy that there’s enough pulp (it may be a good idea to put too much on just in case), and that it’s completely dry you can start shaping it.

Trim back the paper support and the infill if necessary, then, using fine grit sand paper to smooth out the lumps and bumps – however, since the pulp is made of pieces of paper, rather than actual mush, the infill itself will turn out a bit lumpy. Sand down the board edge so it’s straight, and round the corners and edges making sure the faces and edges are even and as smooth as possible.

Infill after 2 layers of pulp, trimming, sanding and shaping.

Infill after 2 layers of pulp, trimming, sanding and shaping.

I would then recommend that the infill was covered with a toned piece of Japanese paper to blend it into the board – and this will even out the lumpy nature of the pulp a bit further. I had a piece of 25gsm that had been toned (with acrylic inks) for a previous project that was perfect – so I used this.

20140718_172211

and Voila! Infill is done – more pictures to follow when I come to reattach it, once we’ve figured out how!

Any questions or comments welcomed, and I’ll do my best to answer you.

Pulped Paper – https://www.preservationequipment.com/Store/Products/Conservation-Materials/Paper-$4-Board/Paper-Pulp